SN's Bridge is Falling Down
Welcome to my first action project for this terms STEAM class, Urban Planning. In this class, we focus on what goes on behind designing architecture. This includes a bunch of physics and knowing what should go where. The first thing we started looking at was bridges. Since we are all in quarantine and can't be close to each other, our teacher video chatted with us as he walked to a well known bridge in the city. From there, we observed its supporting foundations and what makes it special. The next thing we started doing was sketching out our ideas for what our bridges should look like, studied other already existing bridge designs, and then started making them in real life with popsicle sticks and glue our teacher sent to us. It was a really fun thing to do when making them with each other over a video chat. Anyways, the last step was to place our popsicle stick bridges over a one foot gap and see if it could hold itself up against a gallon of water on top of it. The results of this project are down below. I hope you enjoy!
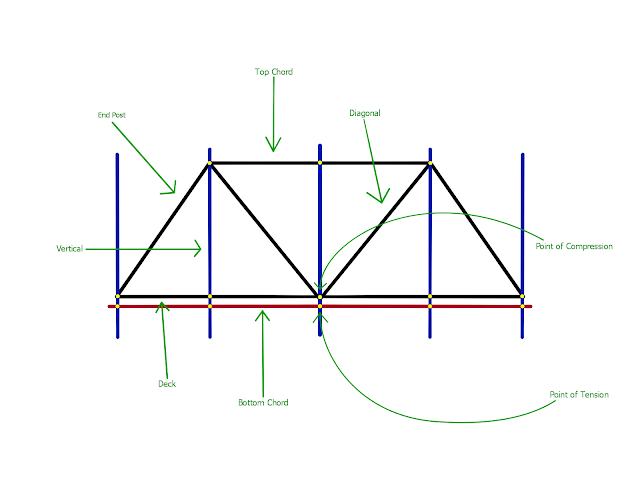
Before I get into the results of the experiment or calculations of my bridges sides, I want to first go over its design. Below is a digital sketch I made earlier in the process of making this bridge. Behind those verticals is what I intended the sides to look like at first. I was going for a basic warren truss bridge design with those equilateral triangles, but it then became basic pratt truss bridge once I added those verticals as the first step to including the bottom chord. It is also important to note that the middle of the deck on most bridges has a point of compression on the top and a point of tension on the bottom. This is because the middle of most bridges is where the bend from a force pushing down on them. When this happens, the bottom of the deck stretches apart and the top of the deck folds in on itself.
My bridge design is one for both driving and walking on. According to SDG 11, one of their goals is to have more convenient places of transport. Since my truss bridge is accessible through both vehicles and walking, all that is left to make it more convenient is to build it in the right location. The “right” location should be an area that consists of those who can barely afford travelling some distance to get to the other side of a gap of some sort.
Below is a slideshow with all of my calculations within it. These calculations include the measurements and angles of one of the triangles in my bridge, along with some other things.
Now, with the moment you have all been waiting for, the water gallon experiment! The results of it are found in the image down below.
I was glad all of my hard work was not destroyed in the end, I was also pretty surprised at the outcome too. This probably meant that it had all of the requirements a regular bridge should meet, and would have broke to pieces if it didn't. In other words, I made a sturdy little bridge with smaller versions of the parts actual ones have and can hold itself up against a gallon of water over a one foot gap. From this experience, I learned that you have to make things into what they are supposed to be in order to get them done right. I took the different parts a regular bridge has and used them as instructions for what goes where from the bottom chord to its verticals that hold the most pieces together at once. I never thought of this before until now. I will never view anything I use that works the same way again because of this. Thank you very much!


Comments
Post a Comment